How to create Service Request which requires Approval and once approved create Tasks or assignments.
New Hire Request is submitted which requires HR approval. Once approved it creates 3 tasks
New Employee – Create AD account
New Employee – Configure laptop
New Employee – Office
Primary steps is to create a service request, followed by approval. This is an overview.
Step 1: Create Templates. Every service request requires at least one Incident and 1 Request detail template and number of task templates depending on requirement
- Login as Remedyforce administrator
- Go to Administration > Configure Application > Templates
- Create 1 Incident Template say SR-INC-New Hire Request, populate queue, description and other required fields.
- Create 1 Request Detail say Name SR-New Hire Request , map Incident Templates as SR-INC-New Hire Request
- Create 3 task templates
New Employee – Create AD account
New Employee – Configure laptop
New Employee – Office
Step 2: Create Service Request form
- Login as Remedyforce administrator
- Go to Administration > Configure Application > Request Definition
- Give name , Service- Service offering (come from business service in CMDB), Pick category where this would be listed , select Incident Template, Service Request Template
- Make it online , this will make it visible
- Check “Automatically Submit for Approval”
- Save
- Under fulfillment tab
- Add 3 task templates
New Employee – Create AD account
New Employee – Configure laptop
New Employee – Office - Save
- Add Questions to form from “Inputs tab”
- If you would like to spun specific task only when question’s answer is Yes or NO then use “Invoke template” option
Example- create Configure laptop only when Laptop needed answer is yes
In this case Invoke and map yes to Task template name New Employee – Configure laptop
- Save the form
- If you would like to pass information from service request form to any field use mapping under “Fulfilment tab – map User Inputs to Templete fields” This would be covered in another blog in detail
- Save the form
Step 3: Create approval process – we will cover detail approval process in another blog
- Create approval process like below.
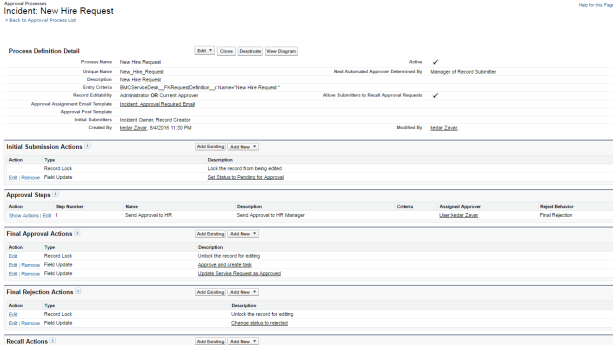
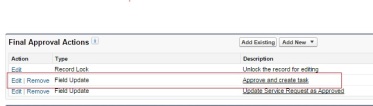
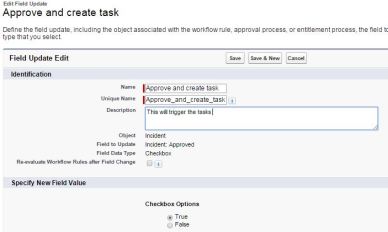
2. Most Important step to trigger task once Service request is approved. You need to have “Field Update” to check “Approved” check box to “ True”. This will trigger the tasks once SR is approved. If you forget to check this box no task would be created
Hope this gives you a good starting point. See Service Request section for more tips.

